KindergartenGeometric Clowns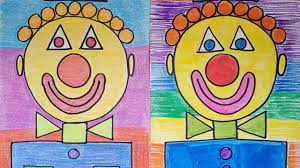
|
|
Activity:
Listen to the Shape of Things on YouTube or read the book a loud. Explain/discuss how objects are made out of different shapes. Show shapes and have them call out what it is. Use the shapes that are going to be drawn to make the clown.
-explain to students you are going to be drawing a picture together with shapes, step by step. It is a secret – you wonder if they will be able to figure it out.
-Pass out paper and pencils
-students write their names small and in the corner – model
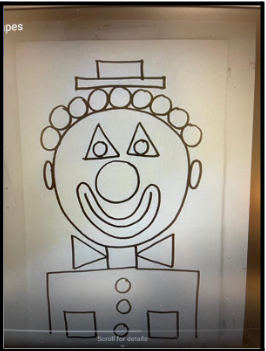
1. Turn your paper the tall way – like a giraffe’s neck.
2. Draw a large circle in the middle of your paper.
3. Make a smaller circle in the middle of the big circle.
4. Draw a curved line (model) and then 2 more underneath. Connect the 2 outside lines with another curved line (this creates the smile)
5. Draw 2 triangles above the smaller circle (inside the big circle)
6. Draw a circle inside each of the triangles.
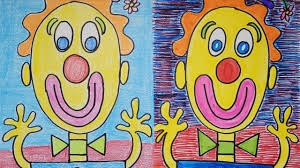
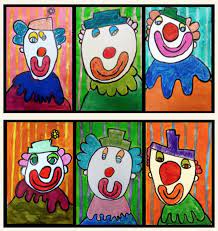
7. Anyone guess what we are drawing yet? Choose shapes or lines (curved or straight) to draw hair on your clown.
8. Now let’s draw a hat- give directions for drawing a rectangle hat, or show/model different options, or let them make up their ow hat design.
9. Below the head, draw a small square for the neck.
10. Now, draw a larger square below and connected to the smaller square. This is the shirt.
11. Draw 3 circles down the middle of the shirt for buttons.
12. On two sides of the square, draw a triangle to form a bow tie.
13. Color your clown with crayons (or markers)
Listen to the Shape of Things on YouTube or read the book a loud. Explain/discuss how objects are made out of different shapes. Show shapes and have them call out what it is. Use the shapes that are going to be drawn to make the clown.
-explain to students you are going to be drawing a picture together with shapes, step by step. It is a secret – you wonder if they will be able to figure it out.
-Pass out paper and pencils
-students write their names small and in the corner – model
1. Turn your paper the tall way – like a giraffe’s neck.
2. Draw a large circle in the middle of your paper.
3. Make a smaller circle in the middle of the big circle.
4. Draw a curved line (model) and then 2 more underneath. Connect the 2 outside lines with another curved line (this creates the smile)
5. Draw 2 triangles above the smaller circle (inside the big circle)
6. Draw a circle inside each of the triangles.
7. Anyone guess what we are drawing yet? Choose shapes or lines (curved or straight) to draw hair on your clown.
8. Now let’s draw a hat- give directions for drawing a rectangle hat, or show/model different options, or let them make up their ow hat design.
9. Below the head, draw a small square for the neck.
10. Now, draw a larger square below and connected to the smaller square. This is the shirt.
11. Draw 3 circles down the middle of the shirt for buttons.
12. On two sides of the square, draw a triangle to form a bow tie.
13. Color your clown with crayons (or markers)
